Friday, April 19, 2024

Simon Says - Celebrating You

Hello my friends, I'm sharing a card made with the Celebrating You 6" x 8" stamp set and dies and the Lace Heart die from Simon Says recent Celebrate release. There are so many amazing new products in this release and you can check them all out HERE.


I sprayed Worn Lipstick Distress Spray Stain and Distress Oxide Spray on to the craft mat on my Glass Media Mat, spritzed with water, pressed a 3.3/4" x 5" panel of Distress Watercolor card into the inks, dried and repeatedly tapped back in to pick up the remaining droplets. I die-cut the Simon Says Lace Heart from Distress Watercolor, Vellum and Sizzix Self Adhesive Sheets.
I fixed the outer heart to the panel with Distress Collage Medium, fixed the Sizzix Adhesive Sheet inner heart into the negative space. peeled back the carrier sheet and pressed the vellum heart into place - a handy tip when you don't want the adhesive to show behind vellum.
I inked the sentiment from the Celebrating You 6" x 8" stamp set on to the vellum, inked with Simon Says Intense Black ink.
I stamped the cute critter image from Celebrating You on to a scrap of Strathmore Bristol Smooth card, inked with Simon Says Intense Black ink and coloured using Zig Clean Color Real Brush Markers, Light Pink, Light Carmine, Mid Green and the Blender Marker.
I die-cut the critter using the matching Celebrating You dies and fixed to the panel using foam squares to create dimension. I die-cut the hearts and leaf sprig from the Lace Heart dies, coloured with Zig Clean Color Real Brush Markers and fixed to the panel with Distress Collage Medium.
I used Tonic Studios Aqua Shimmer Pen to add sparkle to the hearts and once dry, applied a coat of Ranger Glossy Accents. To finish I matted the panel on to Simon Says Green Leaf cardstock trimmed 1/8" larger and fixed to a white card blank.

I'll be back tomorrow to share a card I made for a very special event. In the meantime, enjoy your weekend and have fun with whatever you're making. Hugs Kath xxx

Simon Says May Card Kit - Miss You

Hello my friends, I'm back to share another card using products from Simon Says Stamp Celestial Wishes May Card Kit. This time I used one of the Craft Consortium Ombre patterned papers, the Celestial Wishes 6" x 8"stamp set and Celestial Burst die and changed up the colour palette to match the paper. You can check out all the products included in the kit and if you wish, purchase individual items from the kit HERE.

I trimmed the Craft Consortium Ombre paper to 4" x 5.1/4" and die-cut the Celestial Sunburst 3 times from the Neenah 110lb white cardstock included in the kit. I popped the die-cuts back into their negative spaces and stamped using the matching stamp from the Celestial Wishes stamp set, inked with Tidepool Pawsitively Saturated ink from the Blue Seas Mini Ink Cube set.
I stamped the Sunburst circle also from the stamp set in the centre, inked with the Zest Pawsitively Saturated Mini Ink cube new and exclusive to the kit.
I stamped the larger leaf image from the stamp set on to a scrap of Neenah 110lb white card, inked with Surf, Tidepool and Ocean Pawsitively Saturated Mini Ink Cubes to create an ombre effect and fussy cut.
I fixed the die-cut sunbursts in place with Distress Collage Medium and the leaf popped up on foam squares, stamped the sentiment on to a scrap of card, inked with Simon Says Intense Black ink, fussy cut and fixed to the panel with Distress Collage Medium. There are co-ordinating dies available for this stamp set (linked below) but I didn't have them and I have to say this veteran of fussy cutting found the sentiment a bit of a challenge.
To finish I added splatters to the centres of the sunbursts using Black Soot Distress Paint, sprinkled with Clear Embossing Powder and heat set. I added a twine bow using Spellbinders White Hemp cord and matted the panel on to an A2 white card blank.

I'm still in card kit making mode and will be back soon to share more makes.
Hugs Kath xxx

Thursday, April 18, 2024

Tim Holtz Curiosity Shop - His Notebook

Hello my friends, I'm sharing the His and Her Notebooks I made for the YouTube Live launch of Tim Holtz/Stampers Anonymous new release of stamps and stencils decorated with images from the Curiosity Shop and Wheel, Labels and Spots Layering Stencils.

I trimmed Distress Watercolor card to 4.1/4" x 6" to make covers for notebooks I found in my local bargain stationery store.
Let's begin with the "His" Notebook
I applied Blueprint Sketch Distress Oxide ink randomly over the front cover panel using the Labels Layering Stencil and a Tiny Blending Tool.
I repeated the process using Scorched Timber Distress Oxide ink with the Spots Layering Stencil.
I stamped the numbers image on the side of the panel inked with Black Soot Distress Archival ink.
At this stage, I realised that the background was too white. I sprayed Old Paper Distress Spray Stain on my Glass Media Mat, picked up on a slightly wet piece of cloth and pounced on to the background. I stamped the lightbulb, moustache and sentiment on to the background and the hat on to a scrap of Distress Watercolor card, inked with Black Soot Distress Archival ink, fussy cut and fixed in place with Distress Collage Medium.
I coloured the images with Blueprint Sketch and Scorched Timber Distress Watercolor Pencils and a Detailer Water Brush and flicked the Water Brush off the Scorched Timber pencil to create splatters.
I placed the Spots Layering Stencil over the original stencilling and added a shadow by drawing inside the stencil with the Scorched Timber Distress Watercolor Pencil.
I decorated the back cover in a similiar manner, inked around the edges of both covers with Scorched Timber Distress Ink, flicked on water and dried. I fixed the covers in place with Distress Collage Medium and added Idea-ology Design Tape over the spine.
As an afterthought, I inked the "Just A Note" sentiment with Black Soot Distress Archival ink and stamped randomly over both covers to fill in some of the blank spaces.


I'll be back soon to share the "Her" Notebook.
Hugs Kath xxx

Wednesday, April 17, 2024

Forgotten Garden Shaker Card + Tag

Hello my friends, I'm back to share the Forgotten Garden Shaker Card and Tag, part of the set I made for the YouTube Live launch of Tim Holtz/Stampers Anonymous new collection of stamps and stencils. If you missed the Live, you can catch up on the replay on Tim's YouTube Channel or check out all the amazing projects from the Makers on Tim's Blog.

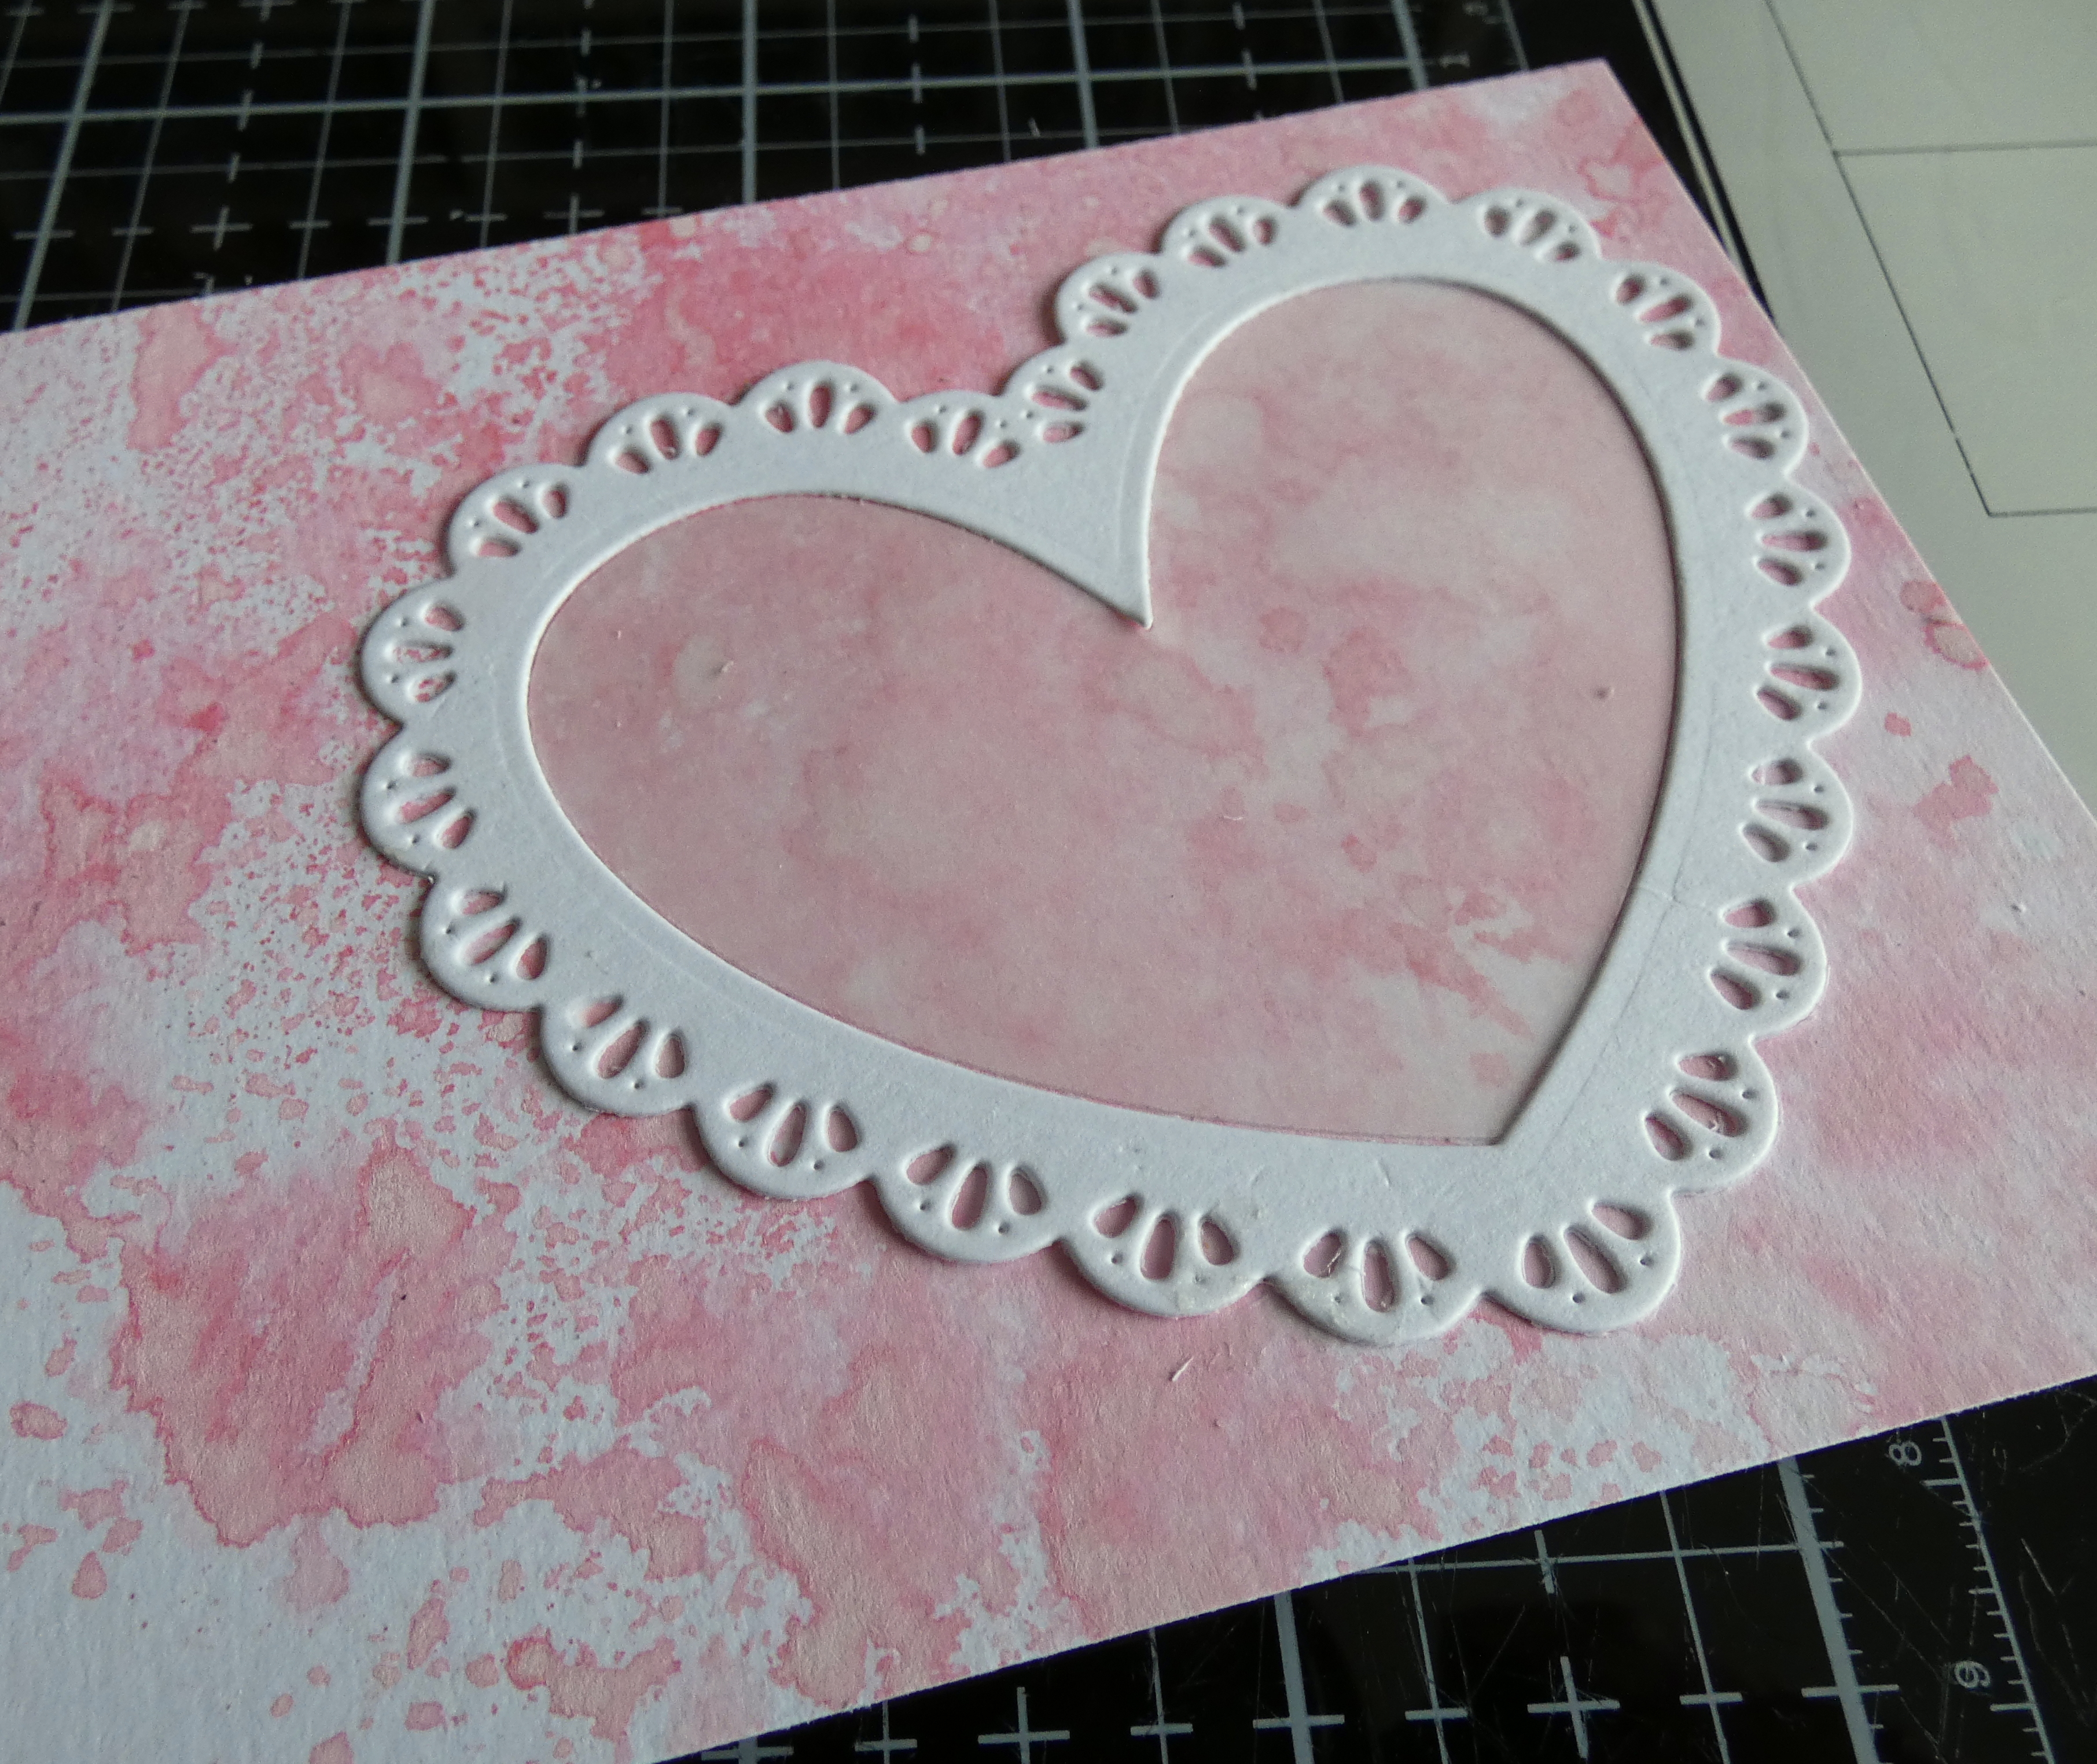
I smooshed my Custom Ink Pad made using re-inkers ( Antique Linen/Old Paper Distress and Speckled Egg/Frayed Burlap Distress Oxide) on to the craft mat on my Glass Media Mat, spritzed with water to create a neutral background on an A2 panel of Distress Watercolor card. I applied Dusty Concord Distress Oxide ink through the Tim Holtz/Stampers Anonymous Labels Mini Layering Stencil from Set 59 using a mini round blending tool.
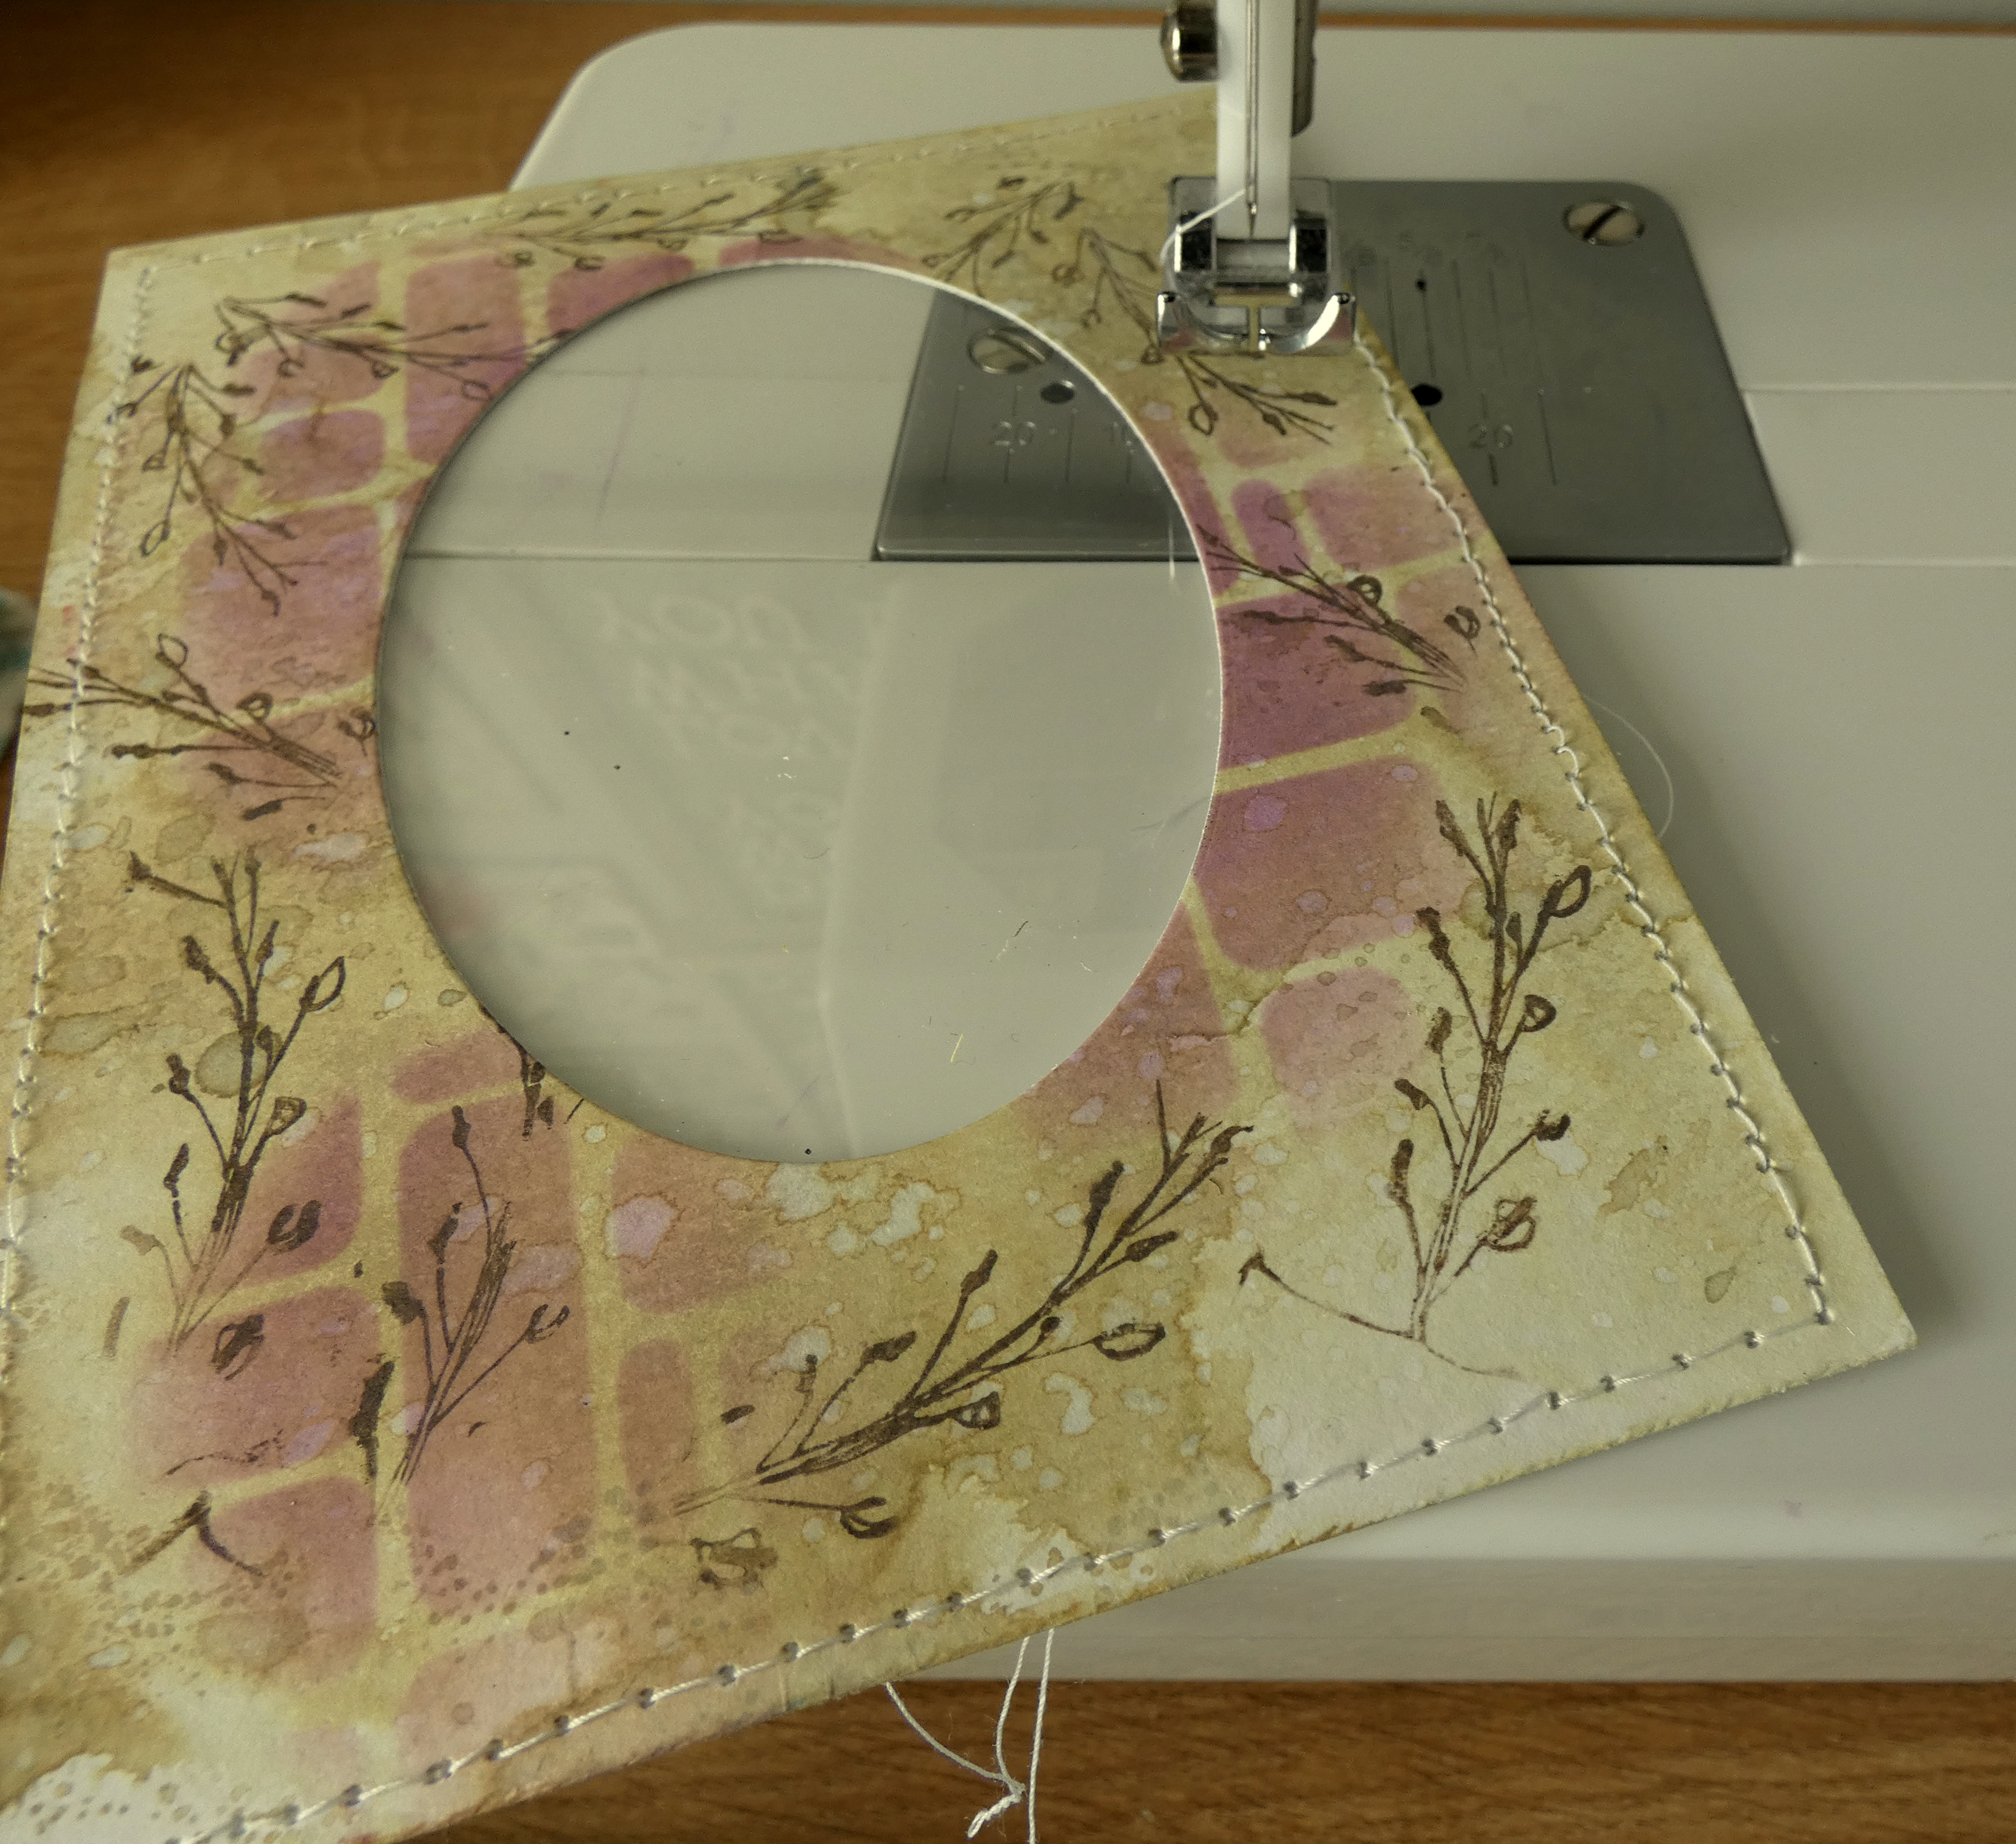
I inked one of the images from Forgotten Garden with Scorched Timber Distress Oxide ink, stamped randomly over the panel and die-cut an aperture using an oval die from my stash.
I machine stitched around the edges of the panel.
I fixed Simon Says Clear Acetate Sheet behind the panel.
I applied Rustic Wilderness Distress Oxide ink through the Spots Mini Layering Stencil from Set 59 on the panel and die-cut insert using a Mini Round Blending Tool.
I created a second A2 panel to fit behind the first panel using the Custom Ink Pad and stamped another of the images from Forgotten Garden on to the panel and the insert, inked with Ground Espresso Distress Archival ink.
I stamped the same image on to a scrap of Distress Watercolor card, coloured with the Custom Ink Pad, coloured with Dusty Concord and Bundled Sage Distress Watercolor Pencils using a Detailer Water Brush, fussy cut and fixed to the panel using Distress Collage Medium.
I inked the sentiments from Tim Holtz/Stampers Anonymous Abstract Florals with Ground Espresso Distress Archival ink and stamped on the front and inside panels and the insert which I decided to use as a tag.
I added Idea-ology Specimen Remnant Rubs.
I fixed foam tape to the back of the front panel and filled with Purple Sequins, Mini Art Stones and Lavender Seeds.
To finish I attached the panel to an A2 white card blank and added Idea-ology Green Velvet Trim and a white twine bow to the tag.


Have fun with whatever you're making.
Hugs Kath xxx

Tuesday, April 16, 2024

Simon Says - Thank You Ever So Much

Hello my friends, I'm back to share another card made with the Celestial Wishes stamp set and Pawsitively Saturated Mini Ink Cubes from Simon Says May Card Kit. You can check out the contents of the kit or purchase individual items from the kit HERE.


I trimmed the Neenah White cardstock included in the kit to create a 4" x 5.1/4" panel and dragged the Zest Pawsitively Saturated Mini Ink cube across the panel. I stamped the sun bursts and butterflies from the Celestial Wishes 6" x 8" stamp set, inked with the Terracotta Pawsitively Saturated Mini Ink Cube.
I added the sentiments from the stamp set, inked with Simon Says Intense Black ink
I fixed the orange gems from Simon Says Warm Tones Pawsitively Dazzling Gems, which match perfectly with the terracotta ink, in place with Distress Collage Medium, matted the panel on to an A2 panel of Simon Says Burnt Orange cardstock and fixed to an A2 white card blank.


Hugs Kath xxx